
!["[New] 2024 Approved A Tutorial for Adding Vintage Touches Instagram Filters on Existing Media"](https://www.lifewire.com/thmb/zw0Z-bfGqX8i4XVXOnsXnouDZuE=/400x300/filters:no_upscale():max_bytes(150000):strip_icc()/how-to-watch-the-crow-movies-in-order-742a37ba4e0748e3a691420484c36796.jpg)
"[New] 2024 Approved A Tutorial for Adding Vintage Touches Instagram Filters on Existing Media"
A Tutorial for Adding Vintage Touches: Instagram Filters on Existing Media
How to Add Instagram Filter to Existing Photos and Videos?

Shanoon Cox
Mar 27, 2024• Proven solutions
How to Add Instagram Filter to Existing Photos and Videos?
Instagram is one of the versatile platforms where people showcase their love for photos and content creation. On social media, users only want to put out photos that look attractive, especially people using Instagram as a blogging platform. Sometimes, pictures come out nice, but you would like to add a filter to enhance them further. Most people are clueless about how to add Instagram filter to existing photo. This article will guide you about all the tips and tricks you can use to alleviate your videos and pictures to make them look vibrant.


- Part 1: How to Add Instagram Filters to Existing Photos?
- Part 2: How to Add Instagram Filters to Existing Videos?
- Part 3: How to Add Filters on Instagram Photos When Uploading?
- Part 4: How to Add Filter to Instagram Reel Photo and Video?
Part 1: How to Add Instagram Filters to Existing Photos?
We all take random photos all the time through our cameras. But, you can be doubtful about posting them on Instagram because they look raw. Some people think they can only apply filters when taking photos directly from Instagram. However, this is not the case because you can apply an Instagram filter to existing images also. It not only makes the picture appear more attractive but also catches the audience’s attention. In this section, you will learn how to apply an Instagram filter to any photo from your gallery.
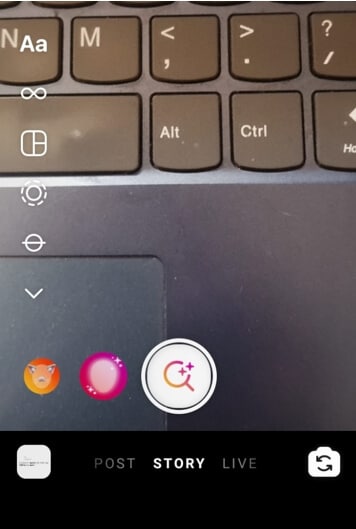
Step 1: Open Instagram and swipe left
To add Instagram filters, you have to open Instagram and log in to your existing ID. When you are on your news feed, you have to swipe left to open the stories option. When you swipe left, your camera will open automatically. Another way to open the stories option is to tap on the ‘+’ sign on your profile picture.
![]()
Step 2: Select an image from the gallery
After you open the stories option, the camera will open first. You can click a photo on the spot or select an existing image from the camera. Look at the bottom left side of the screen; you will see a square box. Click on the square box to select an image from your photo gallery.

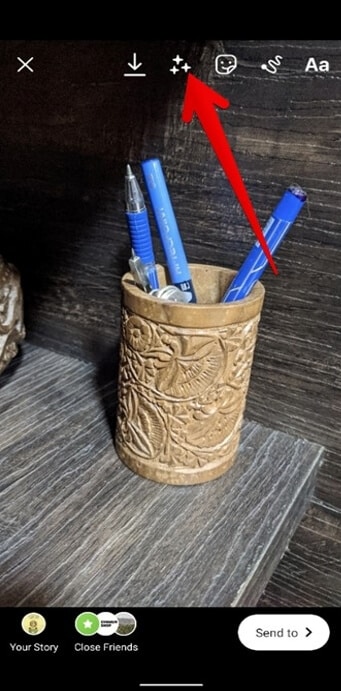
Step 3: press the smiley icon
After you have selected the image from the gallery, you can apply a filter to it before posting. On top of the screen, you will see a smiley or sparkle emoji. Click on the smiley emoji to access the existing or saved filter options to apply to the selected photo.
![]()
Step 4: Select filters
After clicking on the smiley icon, you will be seeing a lot of saved and existing filer options. Swipe left to try out and select a filter you like.

Step 4: Click done and post
After selecting the filter of your choice and applying it, click done on the top right corner and post the story.
![]()
A cross-platform for making videos anywhere for all creators

Why your video editing isn’t good enough? How about some creative inspo?
- 100 Million+ Users
- 150+ Countries and Regions
- 4 Million+ Social Media Followers
- 5 Million+ Stock Media for Use
* Secure Download

Part 2: How to Add Instagram Filters to Existing Videos?
Do you know how to add Instagram filter to existing photo/video? Instagram is now promoting reels through which people can express their creative side. You will see many trending reels on Instagram, and most of them are quite impressive. If you also want to trend on Instagram to gain your followers, your videos should look appealing. You can make your videos get more engagement by adding suitable filters to them. Here is how you can add filters to existing videos:
Step 1: Open camera
You can swipe left on Instagram to open the camera to capture videos for stories.
Step 2: Select a video from the gallery
On the bottom left of the screen, you will see a square box. Click on the square box; you will be taken to your gallery, where you can look for existing photos to upload.
Step 3: Click on the filter carousel
On the bottom, you will find a search icon which is also called the filter carousel. Through the filter carousel, you can find various kinds of filters and also type in the filter name if you have any in your mind. Apply the filter on the video.
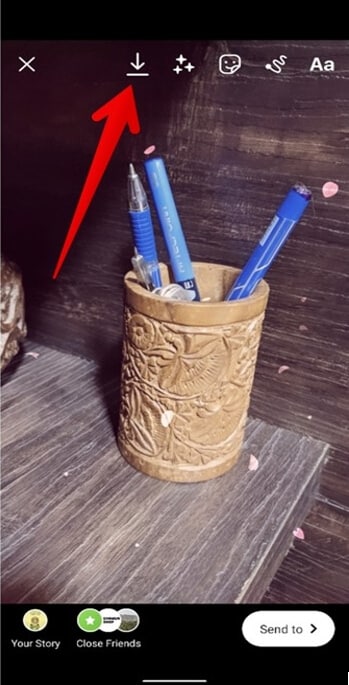
Step 4: Download or upload
After you apply the filter, you can click on done on the top right to post. Also, there is an option to download the video if you like. You can save videos with filters in your gallery to use on other social media platforms.
Part 3: How to Add Filters o Instagram Photos When Uploading?
If you want to make your feed attractive, it should look aesthetic and synchronized. Using a more straightforward type of filter on all images can give your feed a cohesive look. We are going to let you know some simple steps to add filters to your photos when uploading.
Step 1: Click on the plus and select image
When you open the app, you will see a ‘+’ sign enclosed in the square on the middle-end of the screen. Click on it to upload images. You can also swipe up from the stories window to select an image from the gallery. Click next icon after selecting to proceed.
Step 2: Select a filter and adjust
After you click next, you will see a lot of filter options. You can swipe left to try out filters and select the one you like. You can double-tap on the chosen filter to adjust the intensity.

Step 3: Edit the image and post
When customizing the filter intensity, you can select next and click on edit to further enhance the image. You can increase brightness, sharpen the image, etc. When the image is edited as per your choice, you can tag people or simply post.
Part 4: How to Add Filter to Instagram Reel Photo and Video?
A plain Instagram reel without any filters or effects can feel boring to watch. Hence, a lot of content creators use filters strategically to make their reels more appealing. Here is how to add filters to your reel photos and videos.
Step 1: Upload photo or video on Reel
Open the story option and swipe to enable the Reel option. Once you have the reel option opened, go to the gallery and select an image or video of your choice.

Step 2: Click on shine emoji to add filters
On top, you will see a shine emoji option through which you can browse through filters and select the one you like; you can click to apply.
Step 3: post
After you are done adding effects, you can click on done to post, and you can also download the image.
FAQs About Instagram Filters
- Can you add Instagram story filters to existing photos?
Yes, it is easy to add an Instagram filter to existing photos from your gallery. The step-by-step explanation of how to add Instagram filter to existing photo is mentioned above.
- How to add Instagram story filters on camera roll?
Just swipe left to the stories window and swipe up to select an image from the camera roll. Then click on the smiling emoji on the tab and apply the filter of your choice. You can then share it on Insta or save it to your camera roll.
Conclusion
Often people do not know how to add Instagram filters to existing photos and videos. It is easy to learn, especially through the steps we have mentioned above. Filters are the ultimate hack to add cohesiveness and attraction to your feed or stories.
Shanoon Cox
Shanoon Cox is a writer and a lover of all things video.
Follow @Shanoon Cox
Shanoon Cox
Mar 27, 2024• Proven solutions
How to Add Instagram Filter to Existing Photos and Videos?
Instagram is one of the versatile platforms where people showcase their love for photos and content creation. On social media, users only want to put out photos that look attractive, especially people using Instagram as a blogging platform. Sometimes, pictures come out nice, but you would like to add a filter to enhance them further. Most people are clueless about how to add Instagram filter to existing photo. This article will guide you about all the tips and tricks you can use to alleviate your videos and pictures to make them look vibrant.
- Part 1: How to Add Instagram Filters to Existing Photos?
- Part 2: How to Add Instagram Filters to Existing Videos?
- Part 3: How to Add Filters on Instagram Photos When Uploading?
- Part 4: How to Add Filter to Instagram Reel Photo and Video?
Part 1: How to Add Instagram Filters to Existing Photos?
We all take random photos all the time through our cameras. But, you can be doubtful about posting them on Instagram because they look raw. Some people think they can only apply filters when taking photos directly from Instagram. However, this is not the case because you can apply an Instagram filter to existing images also. It not only makes the picture appear more attractive but also catches the audience’s attention. In this section, you will learn how to apply an Instagram filter to any photo from your gallery.
Step 1: Open Instagram and swipe left
To add Instagram filters, you have to open Instagram and log in to your existing ID. When you are on your news feed, you have to swipe left to open the stories option. When you swipe left, your camera will open automatically. Another way to open the stories option is to tap on the ‘+’ sign on your profile picture.
![]()
Step 2: Select an image from the gallery
After you open the stories option, the camera will open first. You can click a photo on the spot or select an existing image from the camera. Look at the bottom left side of the screen; you will see a square box. Click on the square box to select an image from your photo gallery.
Step 3: press the smiley icon
After you have selected the image from the gallery, you can apply a filter to it before posting. On top of the screen, you will see a smiley or sparkle emoji. Click on the smiley emoji to access the existing or saved filter options to apply to the selected photo.
![]()
Step 4: Select filters
After clicking on the smiley icon, you will be seeing a lot of saved and existing filer options. Swipe left to try out and select a filter you like.
Step 4: Click done and post
After selecting the filter of your choice and applying it, click done on the top right corner and post the story.
![]()
A cross-platform for making videos anywhere for all creators
Why your video editing isn’t good enough? How about some creative inspo?
- 100 Million+ Users
- 150+ Countries and Regions
- 4 Million+ Social Media Followers
- 5 Million+ Stock Media for Use
* Secure Download
Part 2: How to Add Instagram Filters to Existing Videos?
Do you know how to add Instagram filter to existing photo/video? Instagram is now promoting reels through which people can express their creative side. You will see many trending reels on Instagram, and most of them are quite impressive. If you also want to trend on Instagram to gain your followers, your videos should look appealing. You can make your videos get more engagement by adding suitable filters to them. Here is how you can add filters to existing videos:
Step 1: Open camera
You can swipe left on Instagram to open the camera to capture videos for stories.
Step 2: Select a video from the gallery
On the bottom left of the screen, you will see a square box. Click on the square box; you will be taken to your gallery, where you can look for existing photos to upload.
Step 3: Click on the filter carousel
On the bottom, you will find a search icon which is also called the filter carousel. Through the filter carousel, you can find various kinds of filters and also type in the filter name if you have any in your mind. Apply the filter on the video.
Step 4: Download or upload
After you apply the filter, you can click on done on the top right to post. Also, there is an option to download the video if you like. You can save videos with filters in your gallery to use on other social media platforms.
Part 3: How to Add Filters o Instagram Photos When Uploading?
If you want to make your feed attractive, it should look aesthetic and synchronized. Using a more straightforward type of filter on all images can give your feed a cohesive look. We are going to let you know some simple steps to add filters to your photos when uploading.
Step 1: Click on the plus and select image
When you open the app, you will see a ‘+’ sign enclosed in the square on the middle-end of the screen. Click on it to upload images. You can also swipe up from the stories window to select an image from the gallery. Click next icon after selecting to proceed.
Step 2: Select a filter and adjust
After you click next, you will see a lot of filter options. You can swipe left to try out filters and select the one you like. You can double-tap on the chosen filter to adjust the intensity.
Step 3: Edit the image and post
When customizing the filter intensity, you can select next and click on edit to further enhance the image. You can increase brightness, sharpen the image, etc. When the image is edited as per your choice, you can tag people or simply post.
Part 4: How to Add Filter to Instagram Reel Photo and Video?
A plain Instagram reel without any filters or effects can feel boring to watch. Hence, a lot of content creators use filters strategically to make their reels more appealing. Here is how to add filters to your reel photos and videos.
Step 1: Upload photo or video on Reel
Open the story option and swipe to enable the Reel option. Once you have the reel option opened, go to the gallery and select an image or video of your choice.
Step 2: Click on shine emoji to add filters
On top, you will see a shine emoji option through which you can browse through filters and select the one you like; you can click to apply.
Step 3: post
After you are done adding effects, you can click on done to post, and you can also download the image.
FAQs About Instagram Filters
- Can you add Instagram story filters to existing photos?
Yes, it is easy to add an Instagram filter to existing photos from your gallery. The step-by-step explanation of how to add Instagram filter to existing photo is mentioned above.
- How to add Instagram story filters on camera roll?
Just swipe left to the stories window and swipe up to select an image from the camera roll. Then click on the smiling emoji on the tab and apply the filter of your choice. You can then share it on Insta or save it to your camera roll.
Conclusion
Often people do not know how to add Instagram filters to existing photos and videos. It is easy to learn, especially through the steps we have mentioned above. Filters are the ultimate hack to add cohesiveness and attraction to your feed or stories.
Shanoon Cox
Shanoon Cox is a writer and a lover of all things video.
Follow @Shanoon Cox
Also read:
- [New] Crack the Code of Imagery's Roots with Our Reverse Analysis Tools for Instagram for 2024
- [Updated] 2024 Approved Breaking Down the Selfie Security on Insta
- In 2024, PixelPanorama Crafting Collage Vids on Gear
- [Updated] 2024 Approved Expert Tips for Avoiding Instagram Video Troubles
- 2024 Approved Discover the Richest Content for Maximum IG Revenue
- [New] In 2024, Mastering Instagram Success Harness the Power of IG Data
- [New] Prime Tools for Pro Video Creation on Android, Windows for 2024
- [Updated] Enhance Visual Harmony Editing for Instagram Standards for 2024
- [New] In 2024, The Art of Instagram Story Layering A Visual Journey
- 2024 Approved Top 10 IGTV Edit Apps Maximize Your Video Content
- [Updated] Master Looped Videos for Maximum Instagram Impact for 2024
- Epic Imagery Crafting Inspiring Instagram Posts #Top20
- Navigating Content Savings Top 5 Techniques to Download IGTV Videos
- [New] Instagram Power Play Top 10 Apps to Increase Followers & Posts
- [Updated] 2024 Approved The Art of Instagram Filter Selection Tips for the Year 2023
- Perfect Tunes Essential Music Guide for Instagram Clips
- [New] 2024 Approved Mastering the Art of Instagram Metrics Analysis – Your Ultimate IG Guide
- 2024 Approved Digital Asset Management Implementing Watermarks on Instagram
- [New] In 2024, IMovie Techniques for Squaring Up Your Instagram Feed
- [Updated] In 2024, Elevating Visual Storytelling Expert Techniques for Instagram Video Edits
- [New] In 2024, A Complete Tutorial on Saving Your Instagram Story
- [Updated] Synergizing Social Networks Share Your IGTV Content for 2024
- In 2024, Posting Vimeo Perfecting Your Instagram Content
- [New] 2024 Approved Master the Art of Instagram-Friendly Video Editing
- 2024 Approved How to Hit the Airwaves with Instagram Lives
- [Updated] Perfecting the Bokeh Aesthetic for Social Media Posts for 2024
- [Updated] Under the Hood Inside Knowledge for Instagram Story Enthusiasts for 2024
- [Updated] Mastering Instagram A Guide to Sharing GIFs in 4 Simple Steps for 2024
- [Updated] Navigating Video Sizes on Instagram - The Ultimate 2023 Guide
- Become a Reel Pro in 30 Days or Less for 2024
- [Updated] In 2024, Unearthing Timeless Treasures A Classic Lit Exploration
- [New] 2024 Approved Top IGTV Gurus You Can't Miss
- 2024 Approved Increase Engagement on IGTV with Top-Notch Titles and Summaries
- In 2024, Sound Symphony for Social Media Stardom on Insta Reels
- [Updated] 2024 Approved Crafting Shareable Instagram Stories That Spread Like Wildfire
- Lead the Way in IGTV Videos with Best-Ever Edits
- [Updated] Mastering Instagram Unfollow Detection for 2024
- Ignite Dialogue Innovative Questions in IG Story Lives for 2024
- [New] Reverse Reality Expert Tips for Turning Images Upside Down on Insta
- [Updated] 2024 Approved Expert Guide to Shooting Awe-Inspiring IGTV Content on Mobile & DSLRs
- Breaking Down Instagram's Video Conversation Protocol for 2024
- [Updated] In 2024, Experts to Follow on IGTV
- [Updated] Transforming Your Instagram Films with Border Magic for 2024
- [New] 2024 Approved Instagram Chronicles Expert Tips for Story Downloads
- Strategic Showcasing 10 Essential Tips to Improve Your Instagram Highlights for 2024
- [Updated] Cracking the Code to Niche Celeb Content Creators on Insta
- All Must-Knows to Use Fake GPS GO Location Spoofer On Motorola Moto G Stylus (2023) | Dr.fone
- Mastering Color Grading in Final Cut Pro 2023 for 2024
- In 2024, New Guide How To Check iCloud Activation Lock Status On Your iPhone 12 mini
- The Best 8 VPN Hardware Devices Reviewed On Nokia C32 | Dr.fone
- 9 Best Free Android Monitoring Apps to Monitor Phone Remotely For your Oppo K11 5G | Dr.fone
- In 2024, The Updated Method to Bypass Infinix Zero 30 5G FRP
- Revolutionize Your Social Media Game Personalizing Twitter Video Images
- Updated In 2024, Dailymotion Video Conversion Made Easy - Free Tool
- Leverage FB for Extensive Reach and Impact
- In 2024, How To Create Quiz Videos Detailed Guide
- In 2024, How to Unlock Infinix Smart 8 Phone Password Without Factory Reset?
- [New] 2024 Approved Sneak Peeks Stealthy Video Capture Techniques
- Full Spectrum Analysis The Complete Logitech 4K Webcam Review for 2024
- New 2024 Approved Find the Suggestions for Sites that Are Alternatives to the Filmora Coupon Code Reddit. These Coupon Sites Offer Different Deals and Discounts
- Complete guide for recovering contacts files on Infinix Note 30 VIP.
- In 2024, Tips And Tricks To Tell if Your Apple iPhone 6s Plus Is Unlocked
- New The Art of Video Resizing Tips for Perfect Proportions for 2024
- In 2024, A Guide Poco X6 Pro Wireless and Wired Screen Mirroring | Dr.fone
- In 2024, How to Change GPS Location on Realme 12 5G Easily & Safely | Dr.fone
- How to Remove Activation Lock On the Apple iPhone 12 mini Without Previous Owner?
- [New] 2024 Approved Mastering Video File Processing MOVs in Windows 11 Edition
- Updated In 2024, Unleash Your Creativity Top 3D Video Makers You Should Know
- Reliable User Guide to Fix Lava Yuva 2 Pro Running Slow and Freezing | Dr.fone
- Spoofing Life360 How to Do it on Vivo Y100i Power 5G? | Dr.fone
- How to Transfer Photos from Vivo Y200 to New Android? | Dr.fone
- [New] 2024 Approved Elevate Viewership Integrating Twitch and Facebook
- [New] A Comprehensive Walkthrough of Adobe Presenter Recording
- In 2024, Top 10 Fingerprint Lock Apps to Lock Your Vivo X Flip Phone
- Title: "[New] 2024 Approved A Tutorial for Adding Vintage Touches Instagram Filters on Existing Media"
- Author: Robert
- Created at : 2024-05-21 13:13:55
- Updated at : 2024-05-22 13:13:55
- Link: https://instagram-video-files.techidaily.com/new-2024-approved-a-tutorial-for-adding-vintage-touches-instagram-filters-on-existing-media/
- License: This work is licensed under CC BY-NC-SA 4.0.
